Failure Study tab
The Failure Study tab runs element failure analysis: put active elements (cavities, quads, solenoids, dipoles — never drifts) into a failure state, sweep over single elements / all pairs / custom sets, rank scenarios by beam impact, and — the MYRRHA / LightWin local-compensation scheme — re-tune neighbouring elements to recover the beam after a failure.
┌ Targets ─────────────┐  ┌ Results ───────────────────────────┐
│ ☑Cavity ☑Quad ☑Sol   │  │ criticality ranking table           │
│ ☑Dipole              │  │ (scenario · criticality · T[%] ·    │
│ [ element list ]     │  │  εnx · εny · εnz · ΔE[MeV] ·        │
├ Failure mode ────────┤  │  loss[%] · recovered · *(rec)*)     │
│ Mode: off ▾          │  ├─────────────────────────────────────┤
│ Amplitude / Phase    │  │ criticality bar chart (top 15)      │
├ Combination ─────────┤  ├─────────────────────────────────────┤
│ single / pairs /     │  │ pair-failure heatmap (N×N)          │
│ custom (set builder) │  │                                     │
├ Fault recovery ──────┤  └─────────────────────────────────────┘
│ ☐ re-tune neighbours │
│ strategy · k/l · algo│
├ Run ─────────────────┤
│ envelope/mp (serial) │
│ [Run failure study]  │
│ [Stop] ▓▓▓▓▓▓▓▓▓     │
└──────────────────────┘
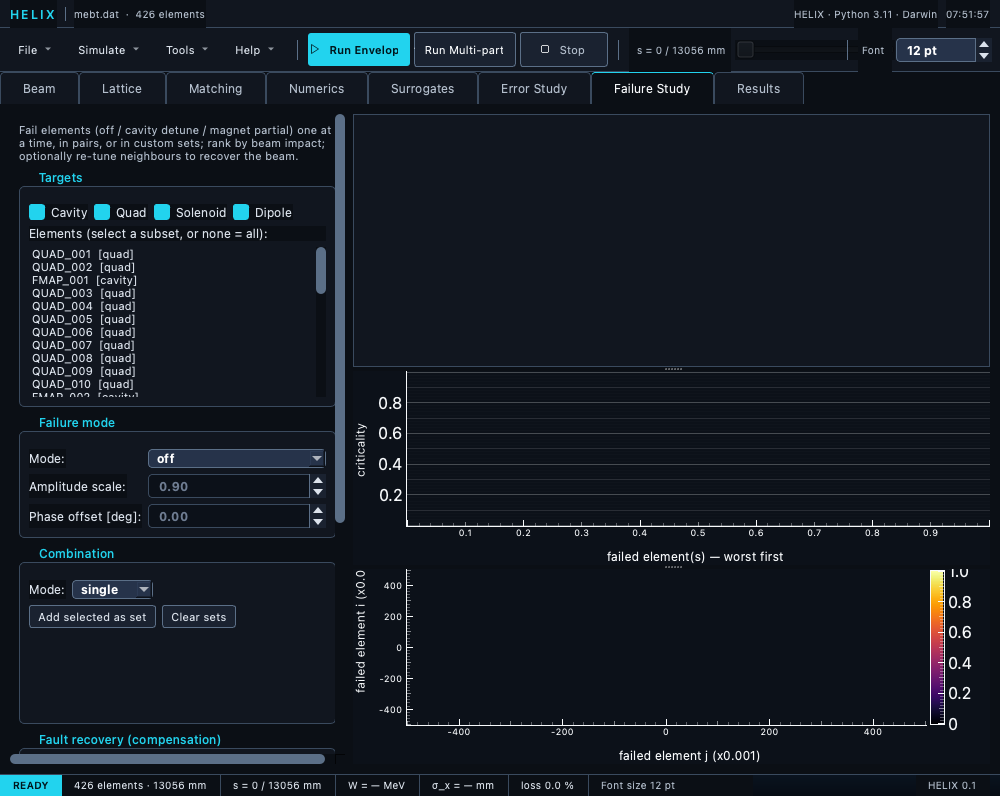
Failure Study tab with the MEBT loaded — failure kind/combination controls on the left, results table and plots on the right.
Controls
Targets
Tick the element types to consider; the element list then shows the failable elements of those types (drifts and passive elements are excluded, as are duplicate-named elements). Select a subset to restrict the sweep, or select nothing to use all of the checked types.
Failure mode
| Mode | Effect | Applies to |
|---|---|---|
| off | element transfers nothing (relative strength → −100 %) | all |
| detune | cavity amplitude scale (e.g. 0.9) and/or phase offset [deg] | cavities |
| partial | magnet field/gradient scaled to a fraction (e.g. 0.90) | magnets |
The amplitude / phase fields enable only for the modes that use them.
Combination
- single — each selected element fails alone → a criticality ranking.
- pairs — every pair fails together → an N×N criticality heatmap with
element-name ticks and a colour scale (the diagonal reuses the single-failure
results). The heatmap fills in live as the sweep runs and the status shows
done/total. Cost is O(N²) — N elements give N + N(N−1)/2 scenarios (16 → 136), and the GUI runs them serially, so on a heavy lattice (e.g. HWR FieldMaps, ~16 s/scenario) a full pairs sweep takes tens of minutes. Practical recipe: run single first to rank elements, then select the few worst in the element list and run pairs on just that subset — or use the CLI with--workersfor a parallel full sweep. - custom — build explicit failure sets: select elements, Add selected as set; each set fails as a unit. Clear sets empties the list to start over.
Fault recovery (compensation)
Tick Re-tune neighbours to recover the beam to attempt compensation of the worst scenarios after the sweep:
- Strategy —
k_out_of_n(the k nearest same-category elements on each side),l_neighboring_lattices(full FODO periods around the fault), ormanual. - k / l — zone size.
- Algorithm — the matcher used to re-tune (
cmaesrecommended for the multimodal RF amplitude+phase landscape;least_squaresfor magnets). - Cost solver —
envelope(fast, recovers energy) ormp(sees beam loss; needed to recover transmission). - Compensate top-N — how many of the worst scenarios to attempt.
The matcher injects temporary ADJUST cards on the compensators (cavity
voltage + phase, magnet gradient/field) and SET_KE_OUT_MIN (+ MIN_TRANSMISSION
in MP mode) objectives to restore the design exit energy without losing beam.
Run
Forward model (envelope/mp). The GUI sweeps serially in-process on
the in-memory lattice so edited/unsaved element names are honoured exactly — the
Workers field is therefore disabled (CLI-only); for a parallel multi-core
sweep use python -m linac_gen failures. Run failure study starts a
background worker; Stop cancels.
Reading the results
- Ranking table — scenarios in descending criticality. Columns:
T [%] (exit transmission), εnx / εny / εnz (normalised RMS
emittances; εnz follows HELIX's βγ·ε_z mm·mrad convention), ΔE [MeV]
(exit-energy deviation), and loss [%] (= 100 − T; shows
—in envelope mode, which models no aperture loss). When compensation is on, a recovered ✓/✗ verdict plus the recovered-case T(rec) / εnx/εny/εnz(rec) columns are appended. - Criticality bar — the top-15 worst scenarios at a glance, worst on the
left, each bar labelled with its failed element(s) (short names, pairs
joined with
+) so a bar maps back to the ranking table by name. Both the bar and the table fill live as the sweep runs. - Pair heatmap — for the pairs combination, the N×N criticality matrix; bright off-diagonal cells are dangerous failure combinations.
The criticality score is a weighted, monotone combination of fractional transmission loss, normalised (βγ·ε) emittance growth, and exit-energy deviation versus the nominal baseline (loss ×10 and energy ×5 weighted highest; each emittance plane ×1). Normalised emittance is used so de-acceleration does not inflate the score through adiabatic damping (which would double-count the energy term) — the same εnx/εny/εnz shown in the table.
CLI / API
The same engine is scriptable:
python -m linac_gen failures lattice.dat \
    --types cavity,quad --mode off --combination pairs \
    --forward mp --workers 8 --energy 2.5 --current 5 --freq 162.5 \
    --compensate --strategy k_out_of_n --k 2 --out failures.csv
from linac_gen.failures import (FailureKind, enumerate_scenarios,
                                 FailureStudy, compensate, CompensationConfig)
scenarios, n2c, names = enumerate_scenarios(lattice, kind=FailureKind.OFF,
                                            combination="single")
res = FailureStudy(lattice=lattice, beam_config=cfg).run(
    scenarios, names, n2c, combination="single")
worst = res.impacts[res.ranking[0]]
cr = compensate(lattice, cfg, worst.scenario, n2c, res.baseline,
                CompensationConfig(strategy="k_out_of_n", k=2))
print(cr.recovered, cr.compensator_names, cr.settings)
A runnable demo lives in examples/failure_analysis/.
Notes
- Envelope mode tracks no particle loss — a cavity failing OFF shows an energy drop but no transmission loss in envelope; use mp to see loss.
- A blank heatmap usually means the sweep is still running — for pairs it
fills cell-by-cell; watch the
done/totalcount in the status line. It also stays blank for single / custom combinations (no pair matrix to draw). - Compensation reports
recovered = Falsehonestly when no feasible compensator can restore the beam (e.g. the dominant cavity failing with too little neighbour headroom).